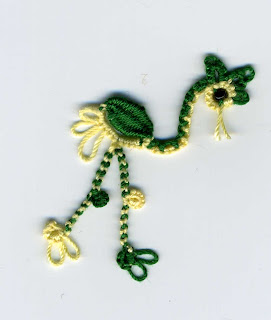
I haven’t measured the amount of thread needed, but it’s not much. Of course, you can use any colors, but I will use green and yellow in the instructions to go along with my picture.
Ch: Chain
CLR: Close Ring
DDS: Daisy Double Stitch
JK: Josephine Know
LSCh: Lock Stitch Chain
R: Ring
RW: Reverse Work
SR: Split Ring
SS: Switch Shuttles
2 shuttles CTM with yellow thread, 1 shuttle with green thread. Tie the green thread to the yellow between the shuttles.
Body: with the green shuttle in your hand as the core thread and one of the yellow shuttles positioned to make a chain, place a paper clip on the core thread to hold a very small picot at the beginning.
Ch: vsp 4 vsp 3 ---- 1 --- 1 -- 1 (That’s three long picots, decreasing in size. Hide the end of the green thread while making this chain. )
Now pull the core thread so the tension will curve the chain a bit. Wind the yellow thread around your thread to make the cluny loom and weave a cluny with the green thread, about 16 passes.
After closing the cluny, use the yellow shuttle to lock join to the paper clip vsp at the beginning.
Neck: Now make a pearl tatted chain, with the green as the upper thread, one yellow shuttle as the core thread , and the other yellow shuttle as the lower thread.
Pearl Ch: [ 1U:2D ] 3 times, [ 1U:1D ] twice, [ 2U:1D ] 3 times. (U=”Up”=number of ds with the upper thread, D=”Down”: number of ds with the lower thread) Pull on the core thread to encourage an S curve in the neck.
Head: Make a split ring with the two yellow shuttles, and use the green shuttle for daisy picots. Put a bead in the center of the split ring. Seed beads are good for size 30, 3mm for size 20.
SR: 2 { SS 3 dds - 3 dds SS} 2 { SS 2 dds - 2 dds SS} 2 { SS 1 dds - 1 dds SS} 2 / 6 clr. Cut, leaving short thread ends to make the beak. (dds = daisy double stitch= unflipped stitches made with another shuttle)
Legs: Tie together 1 yellow shuttle and 1 green shuttle
R: 1 -- 1 -- 3 clr RW
LSCh (lock stitch chain): 5 SS
JK(Josephine knot): 8 half stitches, SS
LSCh: 6 +(join to vsp of body) 6 RW
JK: 8 half stitches, RW
LSCh: 5 SS
R: 1 -- 1 -- 3 clr. Cut and tie.
Here are a few sources for technique tutorials:
Cluny tatting by
MimiPearl tatting by
MarkBead in center of split ring by
Tonya/JaneDaisy picot by
RietLock Stitch Chain by
Mark
 Jane's Emotitats and Sequin Share a Tat have both been in my in-basket for quite awhile, so I finally took care of that.


.HEIC)


