Monday, November 23, 2015

Tatted Mock Hairpin Lace - My Final Solution

Kindly remember a few posts ago, where I showed several versions of mock hairpin lace.  There is no "right" way, but rather one should choose the best version for the project at hand.

This is the way I came up with that works best for my angels.  You can see the traditional crocheted hairpin lace on the left and the tatted mock lace on the right.  


The basic idea is split rings like this: 2 -- 1 -- 1 -- 2 / 2 -- 1 -- 1 -- 2 clr.  Of course, the first and last in a strip of lace may be regular rings instead of split rings.  Depending on the pattern, there may be 3 or 4 long picots on each side.  I haven't tried it yet with smaller or larger numbers of picots.   Instead of the 2 ds at the beginning and end of each ring, I tried 1 vsp 1 and 1 + 1, joining to the previous ring, but this proved to be too fiddly to be worth it.


With the blue angel, I carefully gave each picot a half twist just like real HPL when I made the joins.  The result originally was sort of lanky and stringy, but I was able to block it to look nice.

With the white angel, I joined to the long picots keeping them straight with no twisting, and got this pretty effect without the need to block.  This is a little like my broomstick picots.

In both cases, when joining to the long picots, I was careful not to pull the join too tight, which would bend the curve on the loops.


If you want to know more about broomstick picots, named for their resemblance to broomstick lace, see my post HERE, and there are more patterns using that technique in my book "Playing with Picots"

Thursday, November 19, 2015

More Mock Hairpin Lace

The examples of mock hairpin lace using split rings that I have seen before all had one long picot on each side per split ring, so the dimensions would not work for the patterns I am working on.


But, if you make lots of picots on each split ring, this has definite possibilities.  I'm excited enough with my little test scrap to work on this idea some more.

Tuesday, November 17, 2015

Hairpin Lace - Real and Mock - Kinda long, sorry


Do you remember this  Hairpin Lace and Tatted Angel?  It was the first pattern I shared with Georgia's Online Class.  (The directions are a little primitive compared to how I write now.)

Later update:  Silly me, I forgot there's an updated, improved version right here on this blog.  Just click on "Free Patterns" at the top of the page.  Pardon me while I go sit in the corner and feel dumb for a while  :)


This hairpin and tatted angel is one I taught at Palmetto Tatdays this past year.


I have several more elaborate hairpin and tatted angels in the works.  Would you like to see a book of those?

The patterns are all based on "real" hairpin lace, made with a hairpin loom and a crochet hook. I really like hairpin lace.  After the first fiddly bit getting started, it's quick to make and very neat and pretty.  But maybe not everyone has a loom or wants to learn how.   In planning for the possible book, I wondered about the option for substituting tatted mock hairpin lace for the real thing, so I did a comparison of different types.  (If I had been paying attention, I would have noticed this had been covering in Georgia's class a few years ago.  Go to the 2011 index HERE and scroll down. )

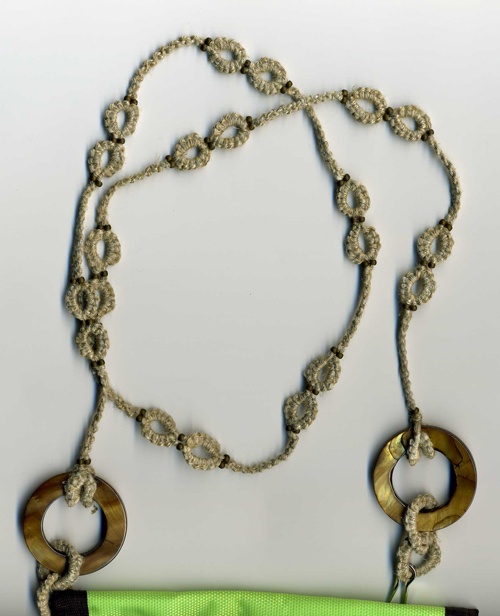
Anyway, these are my results, all pieces 1 inch wide, and 15 loops per side, just as they came off the loom or shuttles without blocking.


1. This is regular crocheted basic braid hairpin lace, made with one single crochet stitch per loop, with a size 6 hook, I think. (Single crochet in American crochet terminology.  I think it is a double crochet in British terminology.)


2.  This is tatting: [2 first half stitches, picot, 2 second half stitches, picot] repeat.  It's about the right size. It's a little messy, but might look neater once the rest of the angel is tatted onto it.

3.  Tatting half stitches like number 2, but with 3 half stitches between picots.  Not as messy, but maybe too wide.


4.  This one is a pearl tatted chain, alternating 1 ds on each side, with long picots in between.  It's a little longer than the real HPL, but might do.


5.  This is a method shared by Ruth Perry with the Online Class HERE.  It is basically {[half stitch, picot, ds all flipped][half stitch, picot, ds all unflipped]} repeat.  It makes the neatest of the tatted mock HPL braids, but much too long for the patterns I am working on. 


6.  I have seen this one in several places.  It is made up of {[picot, ds flipped] [picot, ds unflipped]} repeat.  Not as long as Ruth's, but still too long for my purpose.

7.  This is another "true" crocheted HPL, but with a difference.  In the book, Hairpin Crochet, Technique and Design, by Pamela Thompson, she makes a different sort of basic braid.  Unlike the basic braids in other books I've consulted, she works 1 sc plus a chain stitch per loop.  So this makes a HPL braid with similar dimensions to some of the tatted mock HPL.  Maybe useful for substituting a crocheted braid into a tatted braid pattern.


8.  Not pictured.  There are several patterns where a strip of small split rings with a long picot on each side is used for a HPL like effect.  Some very pretty patterns, but again, very long for the number of loops.

CONCLUSION: There are many sorts of Hairpin lace braids, both traditional and tatted mock versions.  If you are working a pattern using HPL, be sure you are aware which version the pattern is using.  Be very careful with substituting one style for another.


Wednesday, November 04, 2015

Designing - from Doodle to Angel


People sometimes ask me about my designing process.  If I'm making something realistic, like a horse or a flamingo, I go to Google Images for pictures to help visualize shapes and proportions.  Sometimes searching for drawings instead of photos helps.

If I'm doing something more abstract, then I start by drawing the image in my mind.  Just two problems there -- my mental images are often a bit vague .... and I can't draw. My drawings are usually more of a rough doodle.

So here is my sketch for an angel, one little bit on a page of doodles:


Pretty sad, huh?


For the skirt, I was envisionning something similar to this quilt square I did a few years ago, but with one of the tall flowers in the middle. Once I picked up my shuttles, it took maybe ten minutes to realize those flowers were much too big.  So then came lots of experimentation with smaller motifs.  Lots and lots of little motifs, until they looked right and fit together.


Once I had the center bits done, then came the outline to make the angel shape. This was actually easier than the center.  Before starting, I gave a bit of thought to where to begin, and what direction to go in, to make the whole outline in one pass without cuts and ties.

So there you have her, Grace, one of the angels in my book "A Flight of Angels."

Tuesday, October 27, 2015

Past Palmetto - Two by Erin

At Palmetto TatDays this year, a few of us talked about favorite patterns from past years.  I think Erin Holloway Moseley's patterns always have a lot of personality.  When I got home, I pulled out my pattern CD's and found the instructions for these two.


This is Dinky the Cat from 2012. I think it is as cute as can be. The legs are floating chains that make it a little challenging. (long bare thread, later worked over split chain style)


And here is Doodle the Poodle from 2010, I think.  I've admired this one for a long time.  I wasn't paying attention and used beads a little too big, so the feet and tail are a bit lumpy.  I would recommend this one for experienced tatters only.  And do use a bead spinner.  You need a bazillion beads, but they are all on the ball thread.

Palmetto pattern CDs may be ordered here:  http://palmettotatters.org/items/
In the CD and video section, if you click on the year, you can see the projects on that CD.  This year's CD has just come available.  I know some of you have been waiting for it.

Wednesday, October 14, 2015

National Folk Festival comes to town

It's already been a month since the National Folk Festival was held here in Greensboro.  I was only able to attend on the last day, but had a splendid time.


I got to see one of my favorite performers, Rhiannon Giddens.  I've been a fan since she was in a local Celtic band and now she's a famous Grammy winner.  Here she is with her sister, singing wonderful harmonies.  The audience was often invited to sing along.  Can I now say I have sung in concert with her? Though it's a good thing she had a microphone and I didn't.


These are members of the San Francisco Taiko Dojo with Grand Master Seiichi Tanaka.  This was a great, energetic performance that earned an enthusiastic standing ovation.


Then a stage with a group of Piedmont and Blue Ridge artists.  Rhiannon again with fellow Carolina Chocolate member Justin Robinson.  Thomas Maupin, a buck dancer, who spoke about music and dance in a very touching way.  Sheila Kay Adams, who tells stories and sings acapella Appalachian ballads.  Wayne Henderson, who makes and plays guitars.  They would take turns performing or talking and one of them mentioned how string band music was originally dance music, so they all took turns dancing as the others played.


Thursday, October 01, 2015

UFO No More

I finished knitting this a long time ago, but only last week finished blocking and sewing in ends.  This is the Freya Shawl designed by Renate Haeckler, a free pattern on Ravelry HERE.

The pattern is for a 3/4 circle shaped shawl, but I did fewer repeats to make a half circle so my yarn would last for more rows.  I knitted until I ran out of yarn, but I don't remember how many rows short of completing the pattern I was.  It came out a good size though, about 28 inches deep after blocking to a lacy effect.

The yarn was hand spun by me on a drop spindle using some slightly variegated Romney roving, about 9 ounces.


Tuesday, September 29, 2015

Palmetto Fun 3

Here are some class projects from this year's Palmetto TatDays, earlier this month.


During regular class time, I had only one free period, and chose Karey's Pendant Necklace class, and even finished the project later that day.  I adapted it to make a lanyard.  My beads are small, but the only ones I could find locally that went with those rings I wanted to use.  I think I will remake those lower sections to match the rest.


Anyone who knows me well, knows it was greatly out of character for me to get out of bed early enough for the Early Bird Class.  But I greatly admired Karey's Leaping Lambie and wanted go give it a try.  Unfortunately, my brain was still asleep, so after numerous mistakes, I had to trash my in-class project. I made this one after I got home.  It's an interesting pattern, with an onion ring in the head, and roll tatting in the feet.  The pattern also appeared in the August issue of Tatting Times.


Another pattern I made after getting home was Erin's Flowery Crinoline Angel.  Isn't it pretty?  I added a halo.

One of the great things about Palmetto is that they make a pattern CD, so people who couldn't come (or could only be in one place at a time) can get the patterns so they can share the fun.  On the Palmetto site, they say this year's CD should be on sale soon, so check back HERE to find when it is available.

Saturday, September 26, 2015

Palmetto Fun 2


A Palmetto tradition...  The famous poncho ugly has been passed on to a new owner.  Original owner Crazy Mom looks on.  How will they manage to move this on to another unsuspecting victim next time? Time will tell.

Thursday, September 24, 2015

Palmetto Fun 1


Here I am at Palmetto TatDays, having fun with Sherry Celtic Dreamweaver.

And those Moseleys.

:)

Saturday, September 19, 2015

Bee Happy


Look at this sweet card Sarah S. sent me.  The bee is my pattern, I'm not sure about the rest.  It made my day.

Update: the smiley face is the center of Jane's Sun pattern.  I thought it had a Jane-y look to it, but I unscuccessfully looked for it in the Emotitats.

Sunday, September 13, 2015

The Big Day


The wedding party


The happy couple


Such a lovely girl


Mother of the groom


DH chilling out

Monday, September 07, 2015

The Sliding Picot Gauge -or- Conquering the Graduated Picot


I'm just home from Palmetto TatDays.  I had such a good time, but I'm really tired now. So more about Palmetto itself later.

Anyway, I tried out a new idea there, and it seemed to go over well, so I'll share it here too.  I love graduated picots, but they can be hard to get them the right size.  Sometimes I can eyeball them and they look OK, and sometimes they don't.  Sometimes I use a stairstep picot gauge, but sometimes, there aren't the right steps for the picots I need.  


So, I made up this little thing I call a "sliding gauge" and the idea is that you can make one yourself to fit your project.  If you know how many picots are in your set, and how tall the biggest one needs to be, you can draw one on heavy paper and cut it out.  You can read how to to do it.  Click on "Free Patterns" up at the top of the page, and then scroll down for the link to the instructions in a pdf file.

I used the gauge to make the little angel up at the beginning of this post.  It was one of the classes I taught at Palmetto.  You can get the pattern in my new book, A Flight of Angels, or you can get this year's Palmetto pattern CD which will probably be on sale to the public beginning sometime this fall.

Monday, August 31, 2015

A Flight of Angels - On Sale Now


Later... I'm back home now and mailing orders as they come in.  Yes, my husband did mail  the first batch late last week.


I've gotten in the habit having my books debut at Palmetto TatDays.  It's fun to have some suspense and excitment with so many people around.

For those of you that can't come, I am ready to take orders.  I will start mailing when I get home from Tatdays. Since Monday will be a holiday, the mail will start September 8.  Or my husband might mail the ones already packaged while I am away. He does that sometimes.

For more information, click on "Books for Sale" at the top of this page.

I am glad to autograph books, but I don't do it unless you ask.  The Paypal checkout should give you a place to put in "request to seller", but if you don't see that, you can send an email, but don't wait till the next day.


Saturday, August 29, 2015

Look Ma, No Flip!


I wish I could read Japanese, to better appreciate all the Japanese tatting books available now. If anyone can read the language, and I'm getting this wrong, please let me know.

After a careful study of the photos in Tatting Lace Accessories by Kou Nanami, I came to the conclusion there are no flipped stitches in this book.  First I see direct tatted chains, and that's not too surprising, since that method seems to be growing in popularity. (That's the method where you hold the core thread taut and make wrapped, unflipped stitches to form the chain.)  It was the rings that boggled my mind, as they too seem unflipped, a new-to-me type of mock ring.

She holds a loop of the core thread and wraps one stitch over both threads of the loop and then makes the rest of the ring wrapping into the loop.  When done, close the ring by pulling on the core thread.


I made one tiny sample, and it works.  I prefer regular tatting, but this could be a big break through for some one who wants to shuttle tat and has been unable to master the flip.

Of course, you could look at the diagrams and tat the patterns using whichever method you prefer.  It is a very pretty little book and has some oya style flowers in it.

Sunday, August 23, 2015

Coming Soon!


Coming soon, watch this space.

Wednesday, August 19, 2015

More Wiosna


This round went much more quickly, if a bit monotonous.  I should have plenty of time to finish for the state fair, but the county fair is out of the question.  Is it ribbon worthy?  I see lots of little problems, but no telling what judges will think.