BLOCKS & BUTTONS and VICTORIANS REVISITED - Two New Books Now Available!
Showing posts with label tatting. Show all posts

Saturday, May 16, 2009

Almost the End of My Designing Career

I was sorting and discarding stuff in preparation for moving and I came across this old rejection letter from Workbasket:


I remember thinking, "If they were overstocked on tatting patterns, there wasn't much use in trying, was there?" I quit working on refining this heart:


Yeah, right, I know now that a heart built around 3 circles isn't exactly a new frontier. It's been done, but remember way back then, I was tatting in a vacuum. I had a couple of books borrowed from the library, a fairly new subscription to Workbasket, and whatever Dover books were at the local Borders.

I also quit working on a large centerpiece I had been designing. It had (or rather was going to have) a border of butterfly motifs all around it. Later I learned that had already been done too. That UFO is in a box somewhere--I come across it once every few years while looking for something else.

I didn't quit tatting altogether, though for a while I didn't do much more than produce some doilies or edged pillowcases for Christmas presents.

P.S. Needlecraft for Today didn't want it either:


P.P.S. It wasn't such a great butterfly, so I can see why they didn't want it :)


Wednesday, March 04, 2009

Pamela's Hearts

I hope you all have been following Pamela's blog at http://tatsakoolchallenge.blogspot.com/

In the entries from Feb 11 - Feb 28, she has worked all of the hearts from my book, Tat's Amore', in luscious color schemes I wouldn't have thought of, (or didn't have the thread for). When Pamela makes one of my patterns, it looks better than when I did it, so I love looking at her work. The other great thing she has done is to list the amount of thread needed for each piece.

Please go take a look if you haven't already.

Sunday, January 25, 2009

Looking forward to Hector


I am looking forward to the 11th Annual International Tatting Seminar in Hector, NY, sponsored by the Finger Lakes Tatting Group under the leadership of Karey Solomon. Classes will be Saturday and Sunday April 18-19, and on the Friday before, there will be tea and snacks at Karey's shop in the afternoon and an informal bring-a-dish supper at the Firehall in the evening.

This Maltese Teapot is the project for the class I will be teaching. It begins with the Maltese ring in the middle, and then it's downhill from there, with just ring and chain in the outer rounds. The cup pattern is provided as well, should anyone want additional practice with the Maltese ring in a smaller piece. The cup does have split rings.

I teach the Maltese ring using the modern method rather than the Riego version. When I figured out how to make the ring that way, I thought I had made a revolutionary new discovery, but then I learned that method had been discovered before and was already in use by the Shuttle Brothers, Mark, and others.

For the class, you will need 2 shuttles and 2 colors of thread. I told Karey that I recommended size 20 or size 30 thread since I find those sizes easy to work with and big enough to see what you are doing. But if size 10, or 40, or perle cotton is your favorite size, I am sure that will be OK. It is important to use good quality thread. Maltese rings can be difficult to close since they have a lot of stitches. If the thread is not smooth enough to slide well, it may break when you close the ring.

I hope to see many of you there.

Tuesday, January 20, 2009

Motif Twenty-five -- At Last

I haven't shown much tatting lately since most of it looks like this:


But once in a while, it looks like this:


But what to call it? Crazy quilt teapot? Flowers of Spring? I'm not so good at coming up with names.

I claim this as the final entry in my second pass at the Twenty-five Motif Challenge, though I am months behind my year's deadline. After a bit, I expect to start up again.

Friday, October 17, 2008

Motifs Seventeen & Eighteen--Halloween Bling


You've heard me say that strange (craft related of course) ideas pop in my head. Most recently I got the notion to make Halloween jewelry. Yes, I am another one of those that love Halloween and I am munching on candy corn right now. Since I borrowed the shape from one of my other patterns, this one was fairly quick to design. I made up several and mailed most of them away. When someone would come sit next to me to see what dainty ladylike thing I was tatting today, it was funny to hold up a row of grinning skulls instead.


DH helped model since I was having trouble with the camera one-handed.


There are earrings too, but I forgot to model any before mailing away. I haven't made myself a pair yet since I'm still wearing the new ones I bought at the Ren Faire.

Ooooh, had to come back later and add: the pattern is here.

Monday, October 13, 2008

Palmetto Pictures


I can hardly believe it's been over a month since the Palmetto Tat-Days. That is my favorite place to go. I always have the best time getting together with old friends and making new ones. We have such a good time talking and laughing.


I always learn something too. This time it was a better way to separate embroidery floss strands, a better way to pick out lock join knots, and Abby Small's beaded cluny. Well, that last one, I was just looking over someone's shoulder, but after watching, I feel I will be able to do it once I get a chance to try the pattern. I do recommend their pattern CD's for all the great projects. The CD's will be available to order soon, check back at http://www.palmettotatters.org


The Palmetto guild takes such good care of us, with the activities and the gifts and the food.


Here are a handful of pictures so you can tell what fun we had.


Tuesday, September 23, 2008

Motif Seventeen--More Tiny Thread

Here is another teapot, this one worked with King Tut quilting thread. I wish I had measured it or put something else in the picture to give an indication of size before I gave it away. It's probably 2 1/2" wide. This thread isn't quite as forgiving as the cordonette for retro-tatting, but it is still a great thread to work with.

Tatting with tiny thread isn't as hard as you might think. (I remember my trepidation the first time I decided to try size 30 after learning how with size 10.) For these tiny threads, I need my reading glasses to count the stitches, but, heck, I need them for most "average" threads now too. Joining into a tiny space like a lock join requires a very small crochet hook, but for routine joins into picots, the hook on the Aero works fine. For making your tatting, you are working around the thread wound over your left hand, so that part is the same no matter what the thread size. It's much easier than crochet with small thread, with trying to stick the hook into each tiny stitch. If you can work with size 30, you can probably work with size 70 too, and if you can work with that, then the size 100 and quilting threads shouldn't be any problem either. Try gradually stepping down in size and see what you can do.

I got my King Tut from Deb Arnold at DS-9 Designs: http://www.ds9designs.com/index.html

Monday, September 22, 2008

Motif Sixteen--If I Only Had a Brain...

It all started when a friend wished her boss had some brains. I mean, she wanted... oh never mind. After that, lots of people wanted some brains, or knew someone who needed some. To make sure there are enough brains to go around, I added the pattern to my website here: http://my.att.net/p/s/community.dll?ep=87&subpageid=325260&ck=

(My homepage is http://home.bellsouth.net/p/pwp-tatsamore )


Tuesday, August 12, 2008

Motif Fourteen--Maltese Teapot


It took me nine tries to get this one right. Since I knew this would be the last one (no matter what), I worked it in size 100 thread just to see if I could. I went to bed that night (er, um, morning) a tired, but happy, tatter.

Monday, August 04, 2008

BoB's Bike, or Sequins Aren't Just For Snowflakes Anymore


My "send to" partner in the recent Here-Be-Tatter's exchange was BoB the Bike, so I made.....a bike!

The wheels are none other than Jane Eborall's covered sequins.

This was a fun challenge to do.

PS. Motif 12

Sunday, June 01, 2008

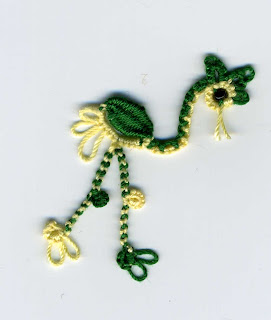
Tatty Bird Instructions

I haven’t measured the amount of thread needed, but it’s not much. Of course, you can use any colors, but I will use green and yellow in the instructions to go along with my picture.

Ch: Chain
CLR: Close Ring
DDS: Daisy Double Stitch
JK: Josephine Know
LSCh: Lock Stitch Chain
R: Ring
RW: Reverse Work
SR: Split Ring
SS: Switch Shuttles


2 shuttles CTM with yellow thread, 1 shuttle with green thread. Tie the green thread to the yellow between the shuttles.

Body: with the green shuttle in your hand as the core thread and one of the yellow shuttles positioned to make a chain, place a paper clip on the core thread to hold a very small picot at the beginning.

Ch: vsp 4 vsp 3 ---- 1 --- 1 -- 1 (That’s three long picots, decreasing in size. Hide the end of the green thread while making this chain. )

Now pull the core thread so the tension will curve the chain a bit. Wind the yellow thread around your thread to make the cluny loom and weave a cluny with the green thread, about 16 passes.

After closing the cluny, use the yellow shuttle to lock join to the paper clip vsp at the beginning.

Neck: Now make a pearl tatted chain, with the green as the upper thread, one yellow shuttle as the core thread , and the other yellow shuttle as the lower thread.

Pearl Ch: [ 1U:2D ] 3 times, [ 1U:1D ] twice, [ 2U:1D ] 3 times. (U=”Up”=number of ds with the upper thread, D=”Down”: number of ds with the lower thread) Pull on the core thread to encourage an S curve in the neck.

Head: Make a split ring with the two yellow shuttles, and use the green shuttle for daisy picots. Put a bead in the center of the split ring. Seed beads are good for size 30, 3mm for size 20.

SR: 2 { SS 3 dds - 3 dds SS} 2 { SS 2 dds - 2 dds SS} 2 { SS 1 dds - 1 dds SS} 2 / 6 clr. Cut, leaving short thread ends to make the beak. (dds = daisy double stitch= unflipped stitches made with another shuttle)

Legs: Tie together 1 yellow shuttle and 1 green shuttle

R: 1 -- 1 -- 3 clr RW
LSCh (lock stitch chain): 5 SS
JK(Josephine knot): 8 half stitches, SS
LSCh: 6 +(join to vsp of body) 6 RW
JK: 8 half stitches, RW
LSCh: 5 SS
R: 1 -- 1 -- 3 clr. Cut and tie.


Here are a few sources for technique tutorials:
Cluny tatting by Mimi
Pearl tatting by Mark
Bead in center of split ring by Tonya/Jane
Daisy picot by Riet
Lock Stitch Chain by Mark

Monday, May 26, 2008

Motif Nine--Second time around


I've been studying techniques lately...

Tuesday, April 22, 2008

Tatting at Hector


Here are a few pictures from Karey's shop and the Hector tatting convention. A good time was had by all.

Tuesday, March 18, 2008

New Book is Finally Ready--Hooray!

I was starting to think I would never get this done, but here it is. You can go to my website for more information. http://home.bellsouth.net/p/pwp-tatsamore

Now I can start thinking about tatting other kinds of motifs again.

Sunday, March 09, 2008

Sneak Peak

I tossed a handful of the pieces from my upcoming holiday/seasonal book on the scanner bed. Now back to work.....

Sunday, January 13, 2008

Some Stuff At My Mom's House

My mother-in-law gave us a camera for Christmas and I've been trying to learn to use it.


These are some things I have given my Mom in the past. First is the tatted Nativity from Ineke Kuperij, worked in size 80 thread.


These are some crocheted angels with musical instruments. A shame they don't show up too well.


A crocheted Madonna from a magazine.


My favorite crocheted angel (I think the pattern book was Pineapple Home) and one of the few remnants of my basket weaving phase.


Monday, November 12, 2007

Rough Draft--Part 3

The story thus far: I had failed at making a maple leaf, but thought the shape suggested an eagle. My first attempt to turn it into an eagle led instead to a baby bird. Now it's time to try to turn that chick into an adult eagle.

Again I let the shapes speak to me, to suggest what they wanted to be. I know it sounds funny, but it's hard to describe. Think of it as doing "free association" but with shapes instead of words.

I decided that the key to the eagle was to turn the wings upside down. I was very pleased with the next draft, despite a mis-start with the tail. From there, it was just tweaking for the final shape. Designers's trick: note how some of the birds have two different wing treatments. If it's not going to be a final draft, a piece doesn't have to be neat or symmetrical. By trying different things in the same piece, you can cut down the number of drafts. I once made a snowflake with 5 different points. Better to have one really ugly one than to make five separate ones before getting it right in my opinion.


Tuesday, November 06, 2007

Rough Draft, Part 2


Those of you who guessed I saw a bird here were right on the money, so give yourselves a pat on the back. Actually, I looked at the first rough draft (the failed maple leaf, remember) and thought I saw an American eagle. I worked another draft, but it looked more like a baby bird than an eagle. But that's OK, a baby bird might be useful. Then it's just a few tweaks for shaping. Note how I begin working in cheap, plentiful "ebay ecru" and switch to the good thread as I get closer to the end.


I wonder if there's still an eagle in there somewhere.