Tuesday, March 08, 2016

Sqaures


Trying to keep my hands busy, here are 4 squares, pattern by Susanne Rolf in her book, "Occhi - Tatting -  Frivolite Mustersammlung."  (She also publishes under the name Susanne Schwenke.)  She designs very pretty patterns, many with some block tatting.  In all her books, each pattern has a diagram, and is also written out in German.  I worked from the diagram without trying to translate the text, and it worked out well.  If you want to try to translate foreign patterns, Georgia has links to tatting terms in various languages HERE.

Working in size 20, each individual square is about 2 1/2 inches across.  I haven't blocked it, just lightly pressed.

Sunday, February 28, 2016

Thank You, Dora


You may know I have a love/hate relationship with Pinterest.  On one of the good days, a picture of this sheep led me to
There's a tab at the top to click for her patterns.


And there I found the pattern for this cat as well. Aren't they both adorable?  Thank you, Dora, for sharing.


By the way, instead of adding the tail at the end, I worked it as a floating chain so I wouldn't have another cut and tie.

I made the sheep with white pearl cotton and the cat with Lizbeth color 611.

Tuesday, February 23, 2016

A Sweet Return

Yeah, I fell off the face of the earth again.  I had some real world issues, and some more real world issues, followed by some procrastination, followed by more procrastination when I realized I didn't have any recent projects to talk about.

I decided to get back into the swing of things with the project from last week's Online Class, the Sweet Heart Valentine by Pop Lenuta Maria, with help from Karen Cabrera.  You can see the pattern HERE.  Muskaan made some beautiful 2 color versions and wrote about them HERE and HERE.

I started off and quickly ran into trouble.  My large rings on the backside layer wanted to twist and curl and the picots were getting too bunched up.  This sort of thing happens sometimes when there is too much tension closing a very long ring.  Usually, I can fix this by closing the ring part way and then loosening up the scrunched up part before finishing the close.  This wasn't working very well for me this time, maybe because the 2 layer effect made it harder to get to the early part of the rings.  Or maybe it was just me that day.  Also, I was working with 2 colors, with a twist between rings, but I didn't like the way it gave color blips between rings.  I cut that one off the shuttles and tried again.

I asked Muskaan's advice since her hearts looked so nice, and she said she did not twist the colors between rings, so I quit that.  I also tried adding a join between the large rings on the back side to see if that would make them lie flatter, and decreased the number of picots. Well, that was better. Muskaan had warned that some bare space between rings was recommended, but I must have not made my bare spaces big enough because my motif curled up quite a bit and required some stern blocking.


So then I thought, working the pattern as orignially written, with all the rings made with the same shuttle might create the proper spacing.  This was much easier to flatten.  It curled up just a bit, but it was easy to mash down just a little and give it a quick press with the iron.


If I ever work this again, it might be a good experiment to make it with 2 colors, and work chains of a few ds between rings.  

Monday, November 23, 2015

Tatted Mock Hairpin Lace - My Final Solution

Kindly remember a few posts ago, where I showed several versions of mock hairpin lace.  There is no "right" way, but rather one should choose the best version for the project at hand.

This is the way I came up with that works best for my angels.  You can see the traditional crocheted hairpin lace on the left and the tatted mock lace on the right.  


The basic idea is split rings like this: 2 -- 1 -- 1 -- 2 / 2 -- 1 -- 1 -- 2 clr.  Of course, the first and last in a strip of lace may be regular rings instead of split rings.  Depending on the pattern, there may be 3 or 4 long picots on each side.  I haven't tried it yet with smaller or larger numbers of picots.   Instead of the 2 ds at the beginning and end of each ring, I tried 1 vsp 1 and 1 + 1, joining to the previous ring, but this proved to be too fiddly to be worth it.


With the blue angel, I carefully gave each picot a half twist just like real HPL when I made the joins.  The result originally was sort of lanky and stringy, but I was able to block it to look nice.

With the white angel, I joined to the long picots keeping them straight with no twisting, and got this pretty effect without the need to block.  This is a little like my broomstick picots.

In both cases, when joining to the long picots, I was careful not to pull the join too tight, which would bend the curve on the loops.


If you want to know more about broomstick picots, named for their resemblance to broomstick lace, see my post HERE, and there are more patterns using that technique in my book "Playing with Picots"

Thursday, November 19, 2015

More Mock Hairpin Lace

The examples of mock hairpin lace using split rings that I have seen before all had one long picot on each side per split ring, so the dimensions would not work for the patterns I am working on.


But, if you make lots of picots on each split ring, this has definite possibilities.  I'm excited enough with my little test scrap to work on this idea some more.

Tuesday, November 17, 2015

Hairpin Lace - Real and Mock - Kinda long, sorry


Do you remember this  Hairpin Lace and Tatted Angel?  It was the first pattern I shared with Georgia's Online Class.  (The directions are a little primitive compared to how I write now.)

Later update:  Silly me, I forgot there's an updated, improved version right here on this blog.  Just click on "Free Patterns" at the top of the page.  Pardon me while I go sit in the corner and feel dumb for a while  :)


This hairpin and tatted angel is one I taught at Palmetto Tatdays this past year.


I have several more elaborate hairpin and tatted angels in the works.  Would you like to see a book of those?

The patterns are all based on "real" hairpin lace, made with a hairpin loom and a crochet hook. I really like hairpin lace.  After the first fiddly bit getting started, it's quick to make and very neat and pretty.  But maybe not everyone has a loom or wants to learn how.   In planning for the possible book, I wondered about the option for substituting tatted mock hairpin lace for the real thing, so I did a comparison of different types.  (If I had been paying attention, I would have noticed this had been covering in Georgia's class a few years ago.  Go to the 2011 index HERE and scroll down. )

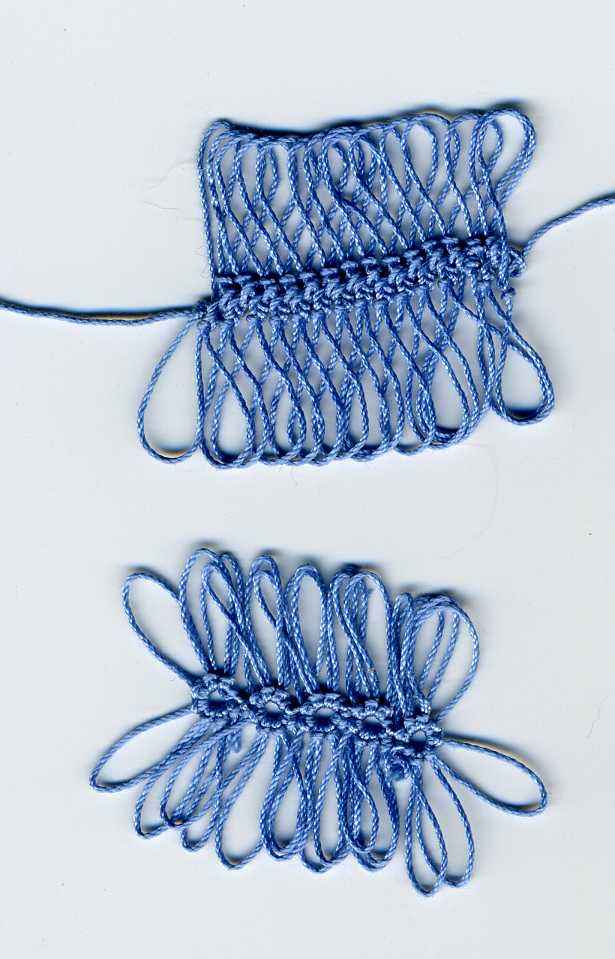
Anyway, these are my results, all pieces 1 inch wide, and 15 loops per side, just as they came off the loom or shuttles without blocking.


1. This is regular crocheted basic braid hairpin lace, made with one single crochet stitch per loop, with a size 6 hook, I think. (Single crochet in American crochet terminology.  I think it is a double crochet in British terminology.)


2.  This is tatting: [2 first half stitches, picot, 2 second half stitches, picot] repeat.  It's about the right size. It's a little messy, but might look neater once the rest of the angel is tatted onto it.

3.  Tatting half stitches like number 2, but with 3 half stitches between picots.  Not as messy, but maybe too wide.


4.  This one is a pearl tatted chain, alternating 1 ds on each side, with long picots in between.  It's a little longer than the real HPL, but might do.


5.  This is a method shared by Ruth Perry with the Online Class HERE.  It is basically {[half stitch, picot, ds all flipped][half stitch, picot, ds all unflipped]} repeat.  It makes the neatest of the tatted mock HPL braids, but much too long for the patterns I am working on. 


6.  I have seen this one in several places.  It is made up of {[picot, ds flipped] [picot, ds unflipped]} repeat.  Not as long as Ruth's, but still too long for my purpose.

7.  This is another "true" crocheted HPL, but with a difference.  In the book, Hairpin Crochet, Technique and Design, by Pamela Thompson, she makes a different sort of basic braid.  Unlike the basic braids in other books I've consulted, she works 1 sc plus a chain stitch per loop.  So this makes a HPL braid with similar dimensions to some of the tatted mock HPL.  Maybe useful for substituting a crocheted braid into a tatted braid pattern.


8.  Not pictured.  There are several patterns where a strip of small split rings with a long picot on each side is used for a HPL like effect.  Some very pretty patterns, but again, very long for the number of loops.

CONCLUSION: There are many sorts of Hairpin lace braids, both traditional and tatted mock versions.  If you are working a pattern using HPL, be sure you are aware which version the pattern is using.  Be very careful with substituting one style for another.


Wednesday, November 04, 2015

Designing - from Doodle to Angel


People sometimes ask me about my designing process.  If I'm making something realistic, like a horse or a flamingo, I go to Google Images for pictures to help visualize shapes and proportions.  Sometimes searching for drawings instead of photos helps.

If I'm doing something more abstract, then I start by drawing the image in my mind.  Just two problems there -- my mental images are often a bit vague .... and I can't draw. My drawings are usually more of a rough doodle.

So here is my sketch for an angel, one little bit on a page of doodles:


Pretty sad, huh?


For the skirt, I was envisionning something similar to this quilt square I did a few years ago, but with one of the tall flowers in the middle. Once I picked up my shuttles, it took maybe ten minutes to realize those flowers were much too big.  So then came lots of experimentation with smaller motifs.  Lots and lots of little motifs, until they looked right and fit together.


Once I had the center bits done, then came the outline to make the angel shape. This was actually easier than the center.  Before starting, I gave a bit of thought to where to begin, and what direction to go in, to make the whole outline in one pass without cuts and ties.

So there you have her, Grace, one of the angels in my book "A Flight of Angels."